
Arvid is an open source and open hardware videocard with the main goal to produce perfect TV output for arcade games of the past emulated on modern PCs.
To achive it the video card has to be able to:
Futhermore, few extra non-arcade related goals were set:
What is such a card good for? Can we simply use TV output from our standard PC video card? Or can we use HDMI to CVBS (TV) convertor? These questions are frequently asked. The answer depends whether you are happy with the output of the avaialble solutions. Many arcade fans are not because of several reasons, but the main one is the refresh rate of the TV output signal produced by the standard video cards, which is locked to either 50 or 60Hz. There is plenty of arcade games that use frame rates different than the standard rates. When such a game is displayed on a TV screen and especially if the game uses scrolling the animation of the scrolling judders and it spoils the game. Some people don't mind, some do. For those who want the best results without having an arcade cabinet in their living room Arvid may be the final solution as it doesn't need arcade monitor yet delivers perfect picture on standard European TV equipped with SCART connector. Note, the TV has to support RGB inputs which was quite common feature for the last 10 years or so these TV sets were produced.
A video of Arvid video card prototype running the port of arvidmame emulator is here.
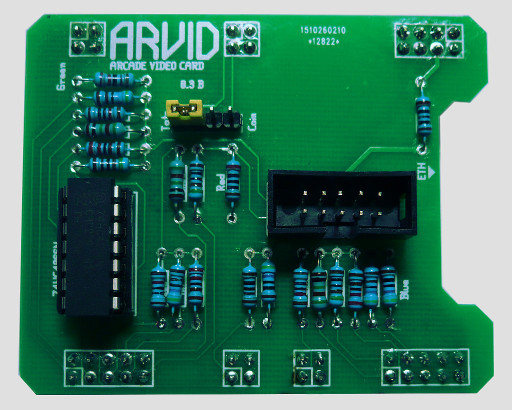
Arvid is based on Beaglebone mini computer - either Beaglebone Black (BBB) or Beaglebone Green (BBG) can be used. It employs the board's GPIO pins to output digital signals and then converts them to analog signals via digital-to-analog converters (DAC). The DACs are made of array of resistors to keep the cost and compexity down.
Arvid outputs 5 signals in total:
Beaglebone (Black or Green) was selected as the base hardware for several reasons:
An extra circuit with the DACs has to be build according the schematics listed bellow. The circuit is now in matured state and meets the goals I set for the project.
The circuit is fairly simple and can be build without soldering just on a breadboard. The scart connector is connected to the breadboard either with soldered wires or via test hooks.Beaglebone and a PC running an emulator is connected through an ethernet cable. I prefer to use network crossover cable to minimize data transfer latencies (no switch or hub is involved). The Beanglebone runs a network server application that receives compressed screens from the emulator, then sends them to GPIO pins to produce TV signal. On the PC side the emulator has to suport Arvid by calling functions defined in arvid client library. The arvid library is simple and straightforward and emulator authors should have no trouble adapt their programs to use it. Arvid firmware (video mode drivers) and software (network server, arvidmame emulator) are ready, see download section for more info.
! Before you start please read this disclaimer!
I'm not responsible for any damage caused directly or indirectly by Arvid or activities related and/or unrelated to its production or usage. You are doing so solely on your own risk. If you set your house on fire while soldering the circuit or if you damage your TV, don't blame me, I'm not responsible for any of that. If you don't agree with that, please stop reading and don't build it.
The circuit schematics looks like this:

Click to see bigger image.
List of parts:
The 4066 quad bilateral switch IC doesn't do anything related to video signal generation, but it fixes Beaglebone start-up issue by disconnecting pins 41,43 and 44 from the ground. It's a shame this Beaglebone quirk has not been fixed yet (it exists even on BBG) otherwise the circuit could be made just out of resistors. The pins are connected when the sync signal is on. If you plan to build the circuit on a breadboard use a chip in DIP package (DIP-14) such as 74HC4066N (the cost is about $1 on eBay)
The Tate and Coin switches are optional, they make sense only if you plan to build-in Arvid into a cab or game console. Emulators and emulator frontends can use the TATE switch to set initial rotation of graphics on the screen. The coin button can be used (suprisingly) as a coin button to supplement missing 'Select' button on some older joysticks (like Sega Genesis Arcade joystick).
Before you connect the circuit to BBB(G) doublecheck every wire and its connections. Also before you first connect the SCART to your TV set doublecheck the output voltage (using multimeter) while Arvid service screen is on. The voltage on the output lines should never be bigger than 1.5 volts on the RGB wires and the sync line. The RGB switch signal however should measure 3.3V on circuit that is not plugged to the TV set.
If you've never build things like this before, just don't rush it. Take your time and tripple check every connection. The construction time is roughly around 4 hours (beginners), BBB setup can take another hour or two (again depending on experience).
The set-up is one time operation only. New simplified installation requires to write the software to microsd card then plug it into the BBG. You will need a PC or Laptop computer that can read/write to microsd card. Then you will need an old microsd card (512 mbytes or bigger).
a) Download the sdcard image from here and uncompress it.
On Windows use
7-zip
tool to uncompress.
On Linux use 'xz' tool to uncompress:
xz -d arvid_sdcard_04f.bin.xz
b) Write the sdcard image to your microsd card.
On Windows use win32diskimager tool to do it. Detailed instructions how to use the tool are here. One note though, you have to run the tool as Administrator.
On Linux use 'dd' tool:
sudo dd if=arvid_sdcard_04f.bin of=/dev/sdX bs=512
Make sure the X in 'sdX' is replaced by your sdcard device (use 'lsblk' command to find out). More detailed
instructions are for example
here.
c) Make sure BBB(G) is turned off, Arvid circuit is connected
and keep the SCART cable DISconnected from your TV yet.
g) Aprox. 15 seconds after the boot the Arvid service screen should appear (keep the SCART cable still disconnected)
showing the RGB color bars, geometry grid and the IP address of the ethernet network interface.
h) Ping to BBB(G) from your PC to make sure the connection is alive:
i) If ping fails, restart the BBB(G) and try again. If ping still doesn't work check the ethernet cable and your
PC network setup. If it still doesn't work check the microsd card and make sure the BBG actually booted from
the sdcard (some older BBG may require to upgrade the bootloader, or to press a button on the board
in order to boot from the sdcard)
j) This step is very important if you build Arvid by yourself! Don't skip it otherwise you might damage your TV set!
Red : 0.49 V
k) Finally connect the SCART cable between Arvid and your TV (while the TV is turned off). Then turn on your TV
and switch to external AV. Some TV support RGB input only on certain SCART port, so try different one if
it doesn't work for you.
The service screen should look like this on your TV:
l) Now start arvidmame and enjoy jour new homebrew video card! :-)
d) Connect ethernet cable between BBG and your PC (or ethernet switch / router).
e) Plugin the microsd card into BBG and power it on. BBG should start and blue leds on the board should
continuously blink.
f) Configure ethernet network card
on your PC to a static IP address. For example like this:
address 192.168.2.20
netmask 255.255.255.0
network 192.168.2.0
gateway 192.168.2.1
ping 192.168.2.101
Doublecheck the voltage on the SCART wires is sane. Using multimeter the values, while Arvid is on the
service screen, should be around (+/- 5%):
Green : 0.49 V
Blue : 0.49 V
Sync line : 0.95 V
RGB switch signal : 3.36 V

I've tested Arvid on various CRT TVs (6 different makers) and few LCD TVs. All CRT TV worked flawlessly - no tearing, progressive scan lines on.
The results on LCD TVs however vary from not working at all (Panasonic, probably because of the non standard timing Arvid produces) to working but stuttering (the same way as on regular laptop screen) to working nicely (one old 13" UMC brand) which even displayed non standard refresh rates completely smoothly. None of the LCDs produced scan lines, they filled-in the space with duplicated pixels.
I don't recommend to use Arvid on LCD TVs as the result will be disappointing. But if you still have a CRT TV around, or you are happy to get one, give it a go.
Arvid software and hardware is licensed under MIT licence.